
Video:
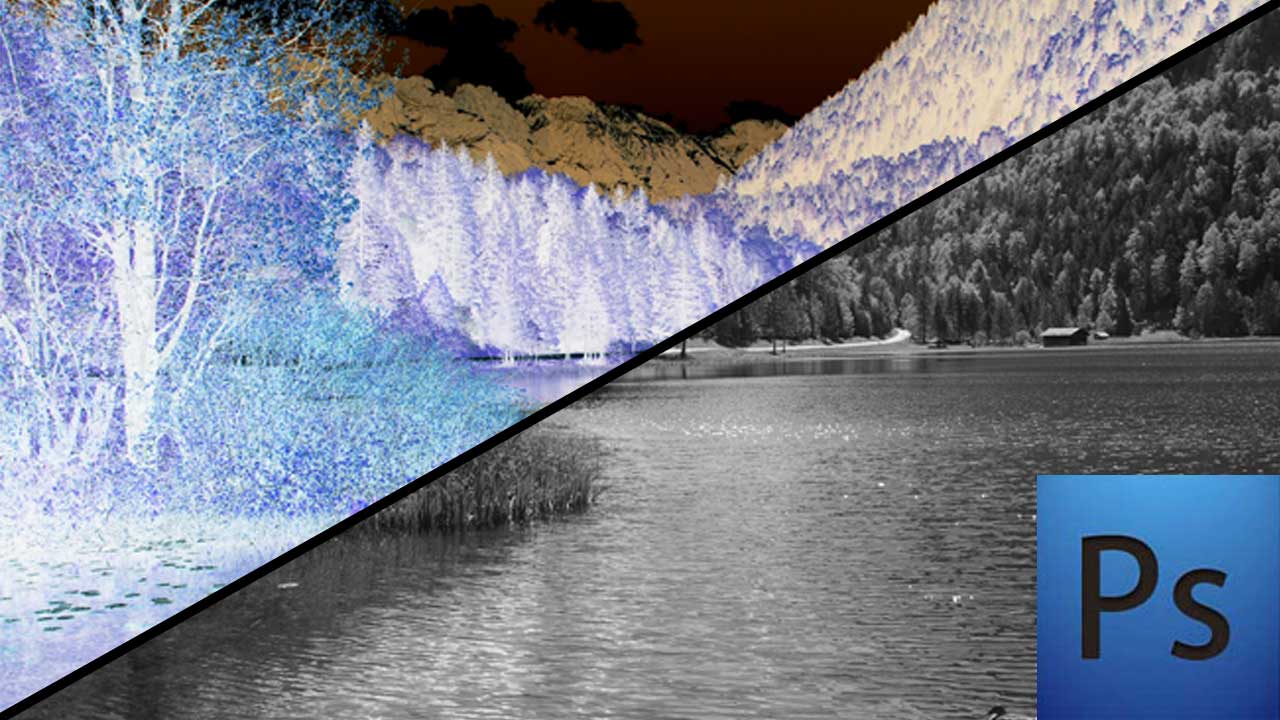
Stare at the black X in the image below. After about 15 seconds of staring at the photo below, it’ll change to a black and white version. Don’t worry, this isn’t one of those scary photos where the monster jumps and screams at you, I promise. What do you see?

You should of seen the photo in color when it turned to black and white. Weird, huh? Today, we’re going to take a look at creating this Negative Illusion effect in Photoshop! You’ll learn how to create a simple animation to create the .gif you see above.
We’ll start off by opening a photo in Photoshop. File > Open. Navigate to the photo you chose and open it up.

Double click the background layer to turn it into a “real” layer. Name it what you’d like and click OK.

Next, with the layer selected, hit Ctrl-J or Cmd-J on a Mac to duplicate this layer.

We need to Invert this copied layer. To do that, go to Image > Adjustments > Invert or use the shortcut key Ctrl-I or Cmd-I on a Mac.

Lets go ahead and hide this layer by clicking the little eye(![]() ) icon to the left of the layer and select your original un-inverted layer.
) icon to the left of the layer and select your original un-inverted layer.

Next, Click the Create new fill or adjustment layer icon (![]() ) and choose, “Black and White“. This should create a new Black and White adjustment layer above your original color layer making it black and white.
) and choose, “Black and White“. This should create a new Black and White adjustment layer above your original color layer making it black and white.

Now if you click the eye icon next to the inverted layer to reveal it, you’ll see the inverted image and when you click it again, you’ll see a black and white image.

You can add a little dot or X somewhere in the middle so the viewer has something to stare at. For an X, just go to the text tool and type an “X” and position it where you want it. Go to the ellipse tool in the shapes to draw out a circle for a circle.

Now, we’re ready to animate this! First, we need to open the animation window. This can be done by going to Window > Animation. Your animation window might be at the “Timeline” view and look like this.

We need to change this into “Frames” view by clicking the little icon to the bottom right of the animation window.

Your animation window should now look something like this.

With Frame 1 selected, click the Duplicate selected frame button (![]() ).
).

With Frame 2 selected, go ahead and turn off the Inverted layer.

The black and white image should now be showing.

Change the duration of Frame 1 to 15 seconds. You can do that by clicking the little time icon below frame 1 and choose “Other…” enter 15 seconds and Click OK. The duration can be whatever you want, anywhere from 10-20 seconds or even shorter if you’re making a quick change back and forth.

Change the duration of Frame 2 to 5 seconds by following the same method above. 5 seconds should already be listed in the menu. You can click the play button to preview your animation.

Now we need to save this as an animated .GIF file. To do this, Go up to File > Save for Web & Devices.
Here, choose GIF as your save type with 256 colors you can add Diffusion at 100% depending on what looks best. Be sure to change the Looping Options to “Forever“. Click Save and save it to your desired location.
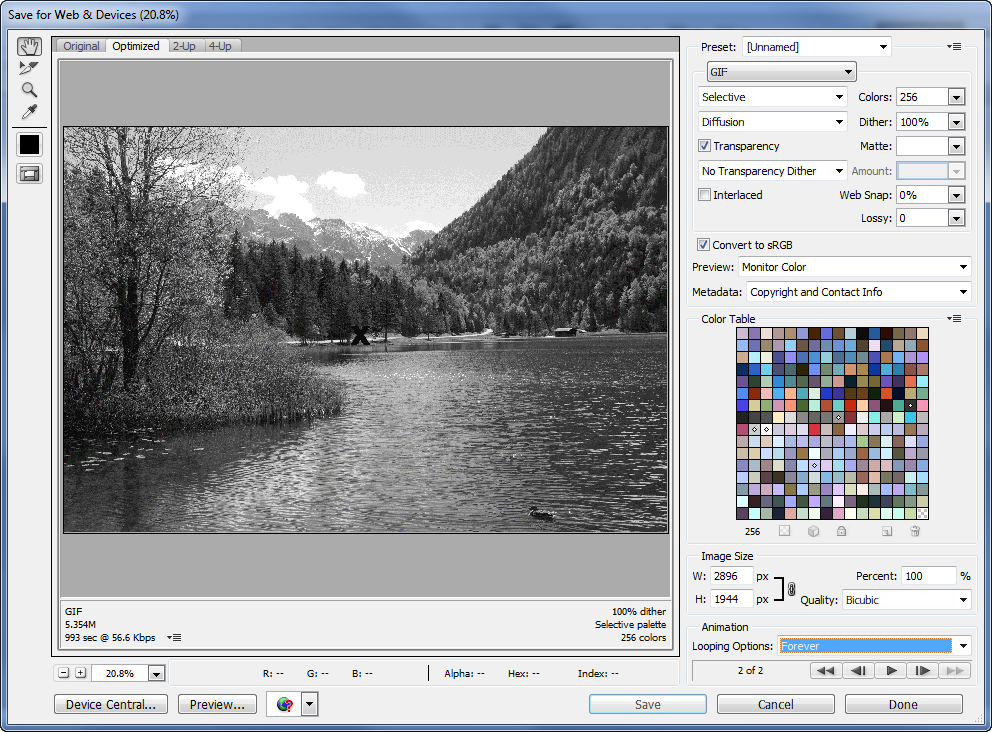
Click the image above to enlarge it if needed.
There you have it! If you happen to create some negative illusions, feel free to share ’em on our Facebook Page! As long as you’re not color blind, this should work.
Have you ever seen these types of Illusions? Do you know of any other cool optical illusions? Share your thoughts in the comments.
Comments